Lab assignments
Lab 1 C programming (Part 1)
Due: 2/14
Lab 2 C programming (Part 2)
Due: 2/26
All labs' git classroom invitation links can be found on Campuswire
AI and Integrity Policy
Please read this.
Background: Working with UNIX for program development
This course assumes familiarity of the UNIX environment as course pre-requisite. If you are new to UNIX, you should take some time to read on your own to master the required knowledge.
Good sources to help you learn UNIX:
- A short course from MIT called ``The missing semester of your CS education''. Note that this course has a lecture on Agent coding. However, you should not use agent coding to do the labs for this course. Learn it for your other non-course-related projects.
- A useful guide: The art of commandline.
- A very short UNIX command cheat sheet.
- Ask AI. It is a good use of AI to help you get familiar with UNIX programming environment.
Lab Setup Preliminary
We use Docker for doing labs so everyone has the same Linux (Unix) enviroment, whether you are on a Mac, Windows or other kind of laptops.
Docker gives you a pre-built lab environment that includes:
- the required Unix tools
- the right C compiler and debugger
- x86_64 architecture environment (what this class is targeting)
Install Docker Desktop
Creating and Running CSO Docker image
Reminder: if your laptop is Windows, type all the commands within WSL.
Do the following:
- Open a terminal and create cso-labs directory to hold all your lab related files.
$ mkdir cso-labs
$ cd cso-labs
- Download the configuration file for creating the required Docker image.
$ git clone https://github.com/NYU-CSO/cso-docker.git
- Create the Docker image. The following command will take a while (several minutes).
$ docker build --platform=linux/amd64 -f cso-docker/Dockerfile -t cso_x86:latest .
- Create and start a new container from the image.
$ docker run --platform=linux/amd64 -it --rm -v "$HOME/cso-labs":/cso-labs -w /cso-labs cso_x86:latest
The above docker run command uses several commandline options:
- --platform=linux/amd64 forces the container to run an x86_64 (aka amd64) Linux. On a Windows laptop with Intel or AMD CPU, it runs normally. On a Mac laptop with Apple-silicon (M-series CPUs), Docker will run the container using x86_64 emulation, so programs inside the container behave like they are running on a x86_64 CPU.
- -it combines two flags: -i (short for iterative) keeps STDIN open so you can keep typing commands and -t allocates a terminal so it feels like a normal shell.
- --rm automatically deletes the container when you exit, avoiding the clutter of lots of stopped and disused container.
- -v "$HOME/cso-labs":/cso-labs mounts a host folder ($HOME/cso-labs) into a folder in the container (as cso-labs/).
- -w /cso-labs sets the working directory inside the container so when the container starts you begin in cso-labs instead of the root directory /
- Test some commands on your newly running container by typing
$ uname -a
- To stop the running (iterative) container, you type exit or press Ctrl-D.
-
(Optional). Lastly, you could add an alias to the long docker run command to avoid having to remember and type the many command options. To do so:
Setting up Git and Github
Learn to use git
Git is a version control system. It allows you to save versions of your work over time. It's like a time machine plus a teamwork system for your program files, where you track changes and safely experiment and collaborate without chaos.
Eddie Kohler has an excellent guide on Git. You should read it.
You can find other comprehensive sources to study here.
This course uses Github to distribute and collect labs. Github is a cloud storage plus other useful project management tools for code using git.
Create a Github account if you do not already have one. The Free plan is perfectly fine.
Set up ssh-based logins to Github.
- In your Mac terminal or Windows WSL, generate a pair of ssh keys by typing:
$ ssh-keygen -t rsa -b 2048
Hit [Enter] a couple of times until you see that the keys have been saved in the files, like the example below

- Display the contents of the public key portion of the key pair by typing the following. You'll need to copy-n-paste this content to github website
$ cat ~/.ssh/id_rsa.pub

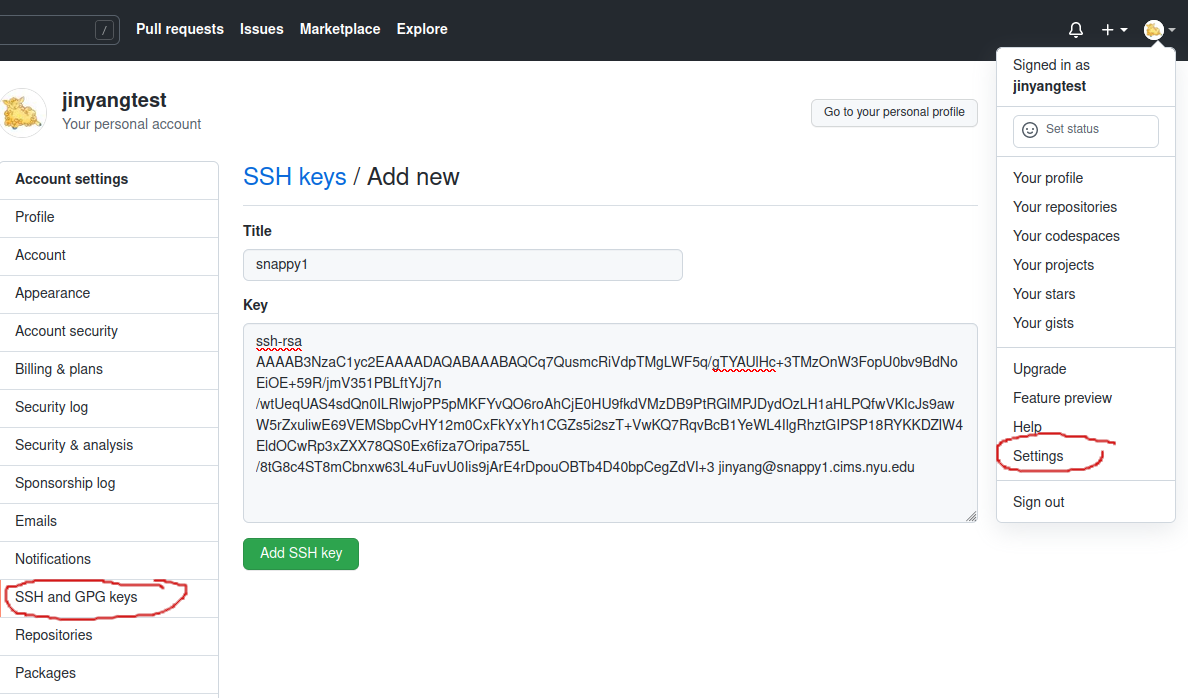
- Enter public key information in github. To do so, use the browser on your laptop to log into github website. Click the icon on the top right corner to pull down a menu, then click "Settings". On the settings page, click "SSH and GPG keys" on the left-side menu, then click the green button named "New SSH key". Type any name (e.g. your laptop's name) in the textbox named "Title". Copy-n-paste the content of your previously generated public key to the textbox named "Key". Then, click "Add SSH key".
Cloning your lab repo locally
Create a github private repository by clicking on each lab's invitation link (posted in Campuswire). Select your NYU NetID to link your github account and create your lab repository on Github.
On your laptop, clone your repo by typing the following (the following example is for clab part1).
$ cd cso-labs
$ git clone git@github.com:nyu-cso-sp26/clab-part1-<YourGithubUsername>.git clab-part1
You will see that a directory named clab-part1 has been created under the cso-labs directory.
This is the git repo for your clab assignment (part 1). Other labs can be created similarly by cloning respective repositories.
Using a command line editor to modify files for your lab assignments.
We recommend using nano. For example, if you want to change file array.c, type the following:
$ cd cso-labs/clab-part1
$ nano array.c
Saving changes to Github while you are working on Labs
As you modify the skeleton files to complete the labs, you should frequently save your
work to protect against laptop failures and other unforeseen troubles.
You save the changes by first "committing" them to your local lab repo and then "pushing"
those changes to the repo stored on github.com
$ git commit -am "saving my changes"
$ git push origin master
Note that whenever you add a new file, you need to manually tell git to ``track it''.
Otherwise, the file will not be committed by git commit. Make git track a new file by typing:
$ git add <my-new-file>
After you've pushed your changes by typing git push origin master, they are safely stored on github.com.
Even if your laptop catches on fire in the future, those pushed changes can still be retrieved.
However, you must remember that doing git commit by itself does not save your changes on github.com
(it only saves your changes locally). So, don't forget to type git push origin master.
To see if your local repo is up-to-date with your origin repo on github.com and vice versa, type
git status
FAQs on Git repository
- What message should I fill in for git commit -am "message"
The "message" can be any string. But we ask you to leave something descriptive as message. In the future, when you check your git logs, this message helps you recall what you did for this commit. We (CSO staff) will never read your commit message. It's not going to affect grading.
- How can I change a message if it's already pushed to GitHub?
You don't need to change a message. There are ways to change messages but for CSO you never need them. Don't do it. It's going to cause conflict. Super dangerous.
- I got an error message Fatal: Not a git repository (or any of the parent directories).
This means you are typing git commands outside the directory containing your git repository. You need to type cd recitations-XXX, where XXX is your GitHub username.
Remember to always type most git commands inside git repository. Commands like git clone, git config --global can be issued anywhere.
- Can I edit files through GitHub.com?
No. You should never do that. That's very likely to cause conflicts. Super dangerous.
Please only use GitHub.com for read-only access, i.e. checking if all your changes have been pushed to your remote repository.
- When I do git pull, I got an error Repository not found.
Check the repository address, there should be no quotes (") or angle brackets (< >). The lab instructions use quotes or angle brackets to mark a placeholder for your GitHub username.
If git pull upstream master fails, then check upstream address by typing
git remote -v
To edit your upstream address, remove it first by typing
git remote remove upstream, and then add it back with git remote add
Handin Procedure
You must do both of the following steps:
Acknowledgements
Some part of this material is based on the lab setup instructions in Prof. Michael Walfish's CS202.